
Thursday, November 18, 2010
Friday, July 30, 2010
And so it's off !


Next post on http://racinginaustralia.blogspot.com/
Saturday, July 24, 2010
Final visit to SEEKER

Around midday on this HOT and STICKY day I dropped off my car at SEEKER's to have the new SPOON baffled oil pan fitted to my car.
This is more of a precautionary insurance policy against a sudden engine failure which can occur under heavy and prolonged cornering. Why now you ask ? Well having bought ADVAN A050s I expect to be pulling more G's and I just don't want to risk exposing the engine to oil starvation under such forces.

The installation itself is actually quite a feat. It requires a complete removal of the bottom engine frame, complete draining of engine oil, removal of the existing pan and then an installation of the new pan. SPOON recommend that a heat bonding adhesive is used to seal the pan to the engine instead of a typical gasket so that in itself requires precision, patience and attention to detail. Anyway it was all done by about 5pm and the end result was something like this ...
 |
| Oil pan fitted. You can see the red bonding agent if you look in closely |
 |
| Bottom engine frame removed |
Here is what the broken mount looked like...You can see the rubber split on top of the mount.

Apparently these original Honda engine mounts don't last very long if you take your car to a circuit more than 5-10 times a year (in my case 20-30 times perhaps!). They tend to break quite a lot in those situations. I was lucky it was just one, the remaining 3 seemed fine. Ryo recommended using non-OEM mounts which are stronger but result in more vibration throughout the cabin. Not ideal for those sensitive drivers. Anyway MUGEN mounts are supposed to be about 10% tougher over the OEM, followed by SPOON which are even more tougher. I didn't have the luxury of choosing or waiting today so I went OEM.
And so that wraps up my day!
Before I end this post, there is one last piece of performance at last ! I'll let this picture speak for itself :)
 |
| This is none other than the brain behind SEEKER's DC5 race car !! All mine now !!! |
Loads of appearances in HOT VERSION DVDs and VTEC CLUB DVDs !


And lastly, here are some parting shots of me and the guys !
 |
| Ryo Teraoka and I |
 |
| Ko Omino and I |
-Rod
Tuesday, July 20, 2010
SEEKER's new website

Monday, July 19, 2010
Shipping preparations
The car's been raised up today in preparation for shipping. The additional 2.5cms all around should help it go on and off a boat ramp quite easily. Ryo from SEEKER did a swift job adjusting the suspension in a 35degree heat of japanese summer and teaching me how to undo it once the car arrives in Perth.
The guys also rolled the fenders in front to accomodate those A050s recently purchased. I must say I am going to miss watching those guys work on my car as it's always been very educational for an amature mechanic like myself.
Other than that, I splashed out on something I'd been thinking about for quite sometime, a SPOON baffled oil pan ! Unfortunately due to time constraints, it won't be fitted until this coming friday but better done in Japan than Perth !
In other news, I took it upon myself to disconnect and remove all electronics however that didn't go without a headache. After disconnecting my HKS lap timer I started getting a Check Engine Light warning and the error was that of a faulty Vehicle Speed Sensor in the transmission. It turns out that disconnecting HKS lap timer without closing the loop on the circuit cuts off the signal from the VSS sensor. Anyway this is not a big deal and i'll ship the car with the CEL on and reset it once it arrives in Perth.
So, probably one (maybe 2) more posts on this japanese blog (I think that would make it 100 in total !) before the car is shipped next week !
Wednesday, July 14, 2010
Got the import approval !
After 2 months of gathering documents, providing translations and chasing up various evidences I was finally granted an import approval to ship my car to Australia ! (I will write up a whole article dedicated to this interesting process once all the dust settles and the car is safely registered and on the road in Australia)
The car leaves my hands July 29th and hopefully will arrive in Western Australia in the first week of September !
The car leaves my hands July 29th and hopefully will arrive in Western Australia in the first week of September !
Sunday, July 11, 2010
Project Mu HC-CS pads !
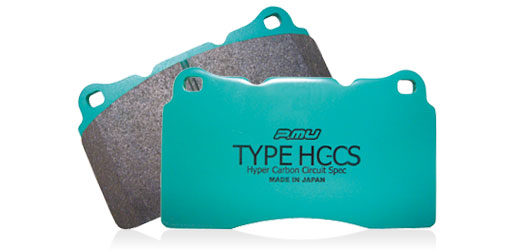
Available only in Japan and released a few months back are these new Project Mu pads HC-CS. CS stands for Circuit Spec and promises a higher level of controllability (meaning less lock-up), lower initial friction (meaning the initial bite is gradual and therefore less obrupt) and a better pedal response. The downside is a little more aggressive wear of rotors.
I bought these pads and haven't tried them yet but i've been seeing very positive feedback from other drivers and it looks very promising.
Available from 24,150yen ~ / 22,050yen (front/back)
Friday, July 9, 2010
さようなら 日本 (Goodbye Japan) !

After about 5 years in Japan I'm moving back to Australia and resuming a much more relaxed lifestyle. Starting August this blog will no longer be updated and in its place a new blog shall be born !
Yes, you can follow my adventures and my car's (it is coming back to Australia with me !) on http://racingInAustralia.blogspot.com

Yes, you can follow my adventures and my car's (it is coming back to Australia with me !) on http://racingInAustralia.blogspot.com

I am moving back to Perth in Western Australia so if you're around Barbagallo Raceway and you see a championship white Honda Integra make sure to say hi ! For those of you who want advice on parts or Honda tuning continue sending your emails and as always i'll try to answer them as best as I can !
I will also continue my close association with my friends from SEEKER whose advice and help I found invaluable ! Thanks Ryo & Ko !
So, without further ado, here is my last ever japanese circuit video before I depart ! It was taken at Fuji Speedway on a very, very wet day on July 7th ! Watch it in its entirety especially towards the end when I spin out ! Enjoy !
Time Attack Battle 2010 - Barbagallo October 29th
The car will be there, I will be there, it will be at night, it will be my 1st in Perth, can't wait so stay tuned !
- Rod

Sunday, June 27, 2010
TGR wins 6HR Endurance Race at Ebisu !!!
The awesome threesome (Tom, Simon and Mike) clenched an amazing victory in this year's "postponed due to snow" 6hr endurance race at Ebisu !!!

Don't get distracted by those racequeens ! :)
Read all about the event here
Rod
Don't get distracted by those racequeens ! :)
Read all about the event here
Rod
Thursday, June 24, 2010
Fun in the wet ...
A few days ago I went to Tsukuba 1000 with the guys from SEEKER to attend my 2nd NOSTALGIA time attack event for the year.
The weather sucked !!! It was humid, hot and raining ! It felt as though there was a typhoon about to pass over ! I got completely drenched getting the car ready but didn't let that discourage me from trying out a few hot laps (or wet laps rather)
After passing an RX-7 shown in the video above and still on my warm-up lap I was on my way towards the same corner as where the RX-7 had lost it and there it happened ! My rear lost grip and started to slide outwards at which point I tried to recover but it was too late! The car had its own mind at that point and went into a 180degree spin aiming straight for the wall. I hit my brakes and locked the steering wheel in one position watching the wall come closer and closer ! The car finally stopped ! I was about half a meter from the wall, facing 3 cars doing at least 70km/h hoping that they saw me and try to avoid me in such a way so as not to go into a spin themselves! I waited for them to pass and I got back on the track. From then on that corner made me super cautious !
It was a very interesting feeling to spin out. I came close many times around various circuits but managed to recover by countersteering except this time when I just had no control. It all happened so quickly and there was very little I could do. Nevertheless it was a great experience and hopefully one which will make me a better driver ! Too bad my in-car camera cut out and I wasn't able to play this back later. Oh well !
Saturday, June 19, 2010

Thursday, June 17, 2010
Fuji Speedway - the short circuit ...
On saturday last week together with my friend James we drove to Fuji International Speedway to try out a new (to us) circuit. It's worth mentioning that there are many circuits/courses at Fuji, the main one being the 4km international racing course I usually drive on, a gymkhana course, a drift course, a kart course, but also a much shorter less known under 1km racing circuit hidden behind a foliage of trees in a valley within the complex.
Shown below is the track layout with the long yellow rectangle representing the pit area. The start/finish line is just below that represented by a checkered flag with an arrow showing direction of movement. Our route for the day was A1/B3/C2.

This track is about 810 meters to 920 meters long depending on which route is designated for the day, has a few uphills and downhills and is generally a very enjoyable little track. Read on for my full impression and if you're interested in more (and can read japanese) click on this link and head to SHORT COURSE.
The traffic to Fuji was a shocker ! James and I left Tokyo seperately but we both got stuck in the same 40km saturday traffic jam which lasted almost 2 hrs. Luckily we both got to the circuit just in time for the 3pm session (the 1st of the 2 sessions we were hoping to attend).
After getting our cars ready we headed out onto the track.

My first lap was about setting up the start/finish line in my PerformanceBox so I basically went out there wearing my usual street seat belt and after registering the correct GPS position I pulled back into the pits and swapped into the racing harness. From then on I drove a few laps trying out different racing lines and getting used to the feel of the car on this somewhat demanding track. After mentally registering what I thought was the best racing line I was ready to attack the circuit.


Shown below is the track layout with the long yellow rectangle representing the pit area. The start/finish line is just below that represented by a checkered flag with an arrow showing direction of movement. Our route for the day was A1/B3/C2.
This track is about 810 meters to 920 meters long depending on which route is designated for the day, has a few uphills and downhills and is generally a very enjoyable little track. Read on for my full impression and if you're interested in more (and can read japanese) click on this link and head to SHORT COURSE.
The traffic to Fuji was a shocker ! James and I left Tokyo seperately but we both got stuck in the same 40km saturday traffic jam which lasted almost 2 hrs. Luckily we both got to the circuit just in time for the 3pm session (the 1st of the 2 sessions we were hoping to attend).
After getting our cars ready we headed out onto the track.

My first lap was about setting up the start/finish line in my PerformanceBox so I basically went out there wearing my usual street seat belt and after registering the correct GPS position I pulled back into the pits and swapped into the racing harness. From then on I drove a few laps trying out different racing lines and getting used to the feel of the car on this somewhat demanding track. After mentally registering what I thought was the best racing line I was ready to attack the circuit.


James chasing me in his red Alpha !

The in-car video below shows a number of laps with the best lap for the day being 37''50 (I dont know why but my PerformanceBox suffered from a few dropouts during my runs and so the sync of video with the GPS location is slightly off)
So how did the track rate ?
Besides finding the 1st corner (entry to A1 route) very tough on my left upper arm I really enjoyed the track ! I especially liked the high speed entry to that very corner ! I know James enjoyed it also because he was flooring it and his left rear was lifting off the ground !
An entry and a subsequent exit (from B3 route) into the back straight was particularly enjoyable !! The car felt great and suffered no understeer ! In fact there were a few moments when I needed to correct oversteer and overall I felt very competitive. I hate to say this but I prefer this track over Tsukuba 1000 ! Tsukuba 1000 is too flat, Fuji short course has the added excitement of uphills and downhills, different angles, speeds.
Big thanks to Tom for showing up and taking nice action shots of the car !
Note to myself, drink plenty of fluids before and during a track day ! I suffered from bad heat exhaustion and felt terrible in the middle of my stints. Had it not been for ice cold water and loads of cool air conditioned air I probably would have called it a day after just 10 mins !
Tuesday, June 8, 2010
Saturday, June 5, 2010
Should have paid !
I decided to save a few bucks (or yen rather) and install the Mugen intake by myself. From what I thought would be a simple 1-2 hr job turned out to be a 4 hour uphill battle.
Making use of my neighbour's parking bay

Removed the battery.
Damn that thing was heavy !

OEM airbox came out without any issues.

Started with the bottom piece of the Mugen intake.
Getting the 3 damping bushes out from the OEM box was a pain the ass ! Had I read the instructions I probably could have saved a lot of time here !

Mugen filter went in (or rather K&N badged as Mugen)

Putting the top cover on was where it all went south !
Bloody thing wasn't the best fit. I was surprised that I needed to mess around so much with the bolts to make the whole thing fit ! The top cover isn't perfectly aligned nonetheless.

At the end of it battery went back in !

There was a sticker in the package so on it went also !

I decided to cut a hole in the front bumper to enable better air flow.
It now resembles the Mugen front bumper and at no cost !

I also cut off the rubber seal under the bonnet right in the area above the hole

A shot from underneath shows the opening

Anyway, it's done but next time I am paying someone else to sweat over it !
Took it for a test drive.
Everything seems to be ok. Traffic in the area was heavy so couldn't really rev too high. Will try it later tonight again to see how it goes.
Heat reflective sheets will go on tomorrow.
Friday, June 4, 2010
Do you like my nuts ?!
Another (and last) addition to the much anticipated arrival of my new Rays CE28Ns, a new set of wheel nuts ! (What did you think I was talking about ??)

These are made by KYO-EI, the size is M12x1.5, 44mm long, includes 16 nuts, 4 lock nuts and 2 keys. They're extremely light and durable !

Rod

These are made by KYO-EI, the size is M12x1.5, 44mm long, includes 16 nuts, 4 lock nuts and 2 keys. They're extremely light and durable !

Rod
Mugen (無限) air intake kit is here !

I had been looking for a decent intake for quite some time. Deciding between J's Racing super sexy Kuchinoko intake, Mugen's highly functional airbox and Gruppe M's somewhat unusual system wasn't easy. They each bring something special to the table and whether it's the looks, function or price this decision just wasn't easy nor quick !
To start with, a J's Racing intake makes your engine bay look really, really nice, is very light being made of fibreglass but unfortunately it's also very expensive !! It's hard to part ways with over 100,000yen for just an intake. I wasn't too excited about the power gains presented to me either ! (it's worth to note this system uses a cone shaped filter)
So then I looked at Gruppe M being hugely popular or should I say well promotioned (is that a word ?) in Japan. It however draws air from just in front of the windshield through a snorkle-like design however the opening is too narrow and the air gets a lot of disturbance (and water!!) as it passes over the bonnet resulting in uneven pressure flow.
So finally we have Mugen which is backed up by Honda, guarantees a 30% increase in air pressure and a 10° C drop in air temperatures throughout the system, is very lightweight made of fibreglass and draws its air from the very front of the vehicle where it's at its coolest. Those combined with the fact that it is highly recommended by SEEKER and used a lot amongst DC5 owners I've met here in Japan my decision was made.
Now before I move on, I did consider "other intakes" but most if not all used a short tube system which draws hot air from the engine bay and suffers from terrible heat soak. If you're after looks and a nice intake sound then those are perfect for you, if you want some function and efficiency then Mugen or J's Racing!
Anyway here it is unpacked and boy is it light !!
I remember when I removed the OEM airbox cover last year to replace its original air filter, the cover alone was heavier than this system is in its entirety !

My supplier provided the box at a 30% discount on the original retail price so a nice bargain as always !
It will be fitted hopefully this weekend and I'll post some photos!
Friday, May 28, 2010
A word about Level Max700 pads
I've been using these since Suzuka and I am noticing a fair bit of vibration under heavy braking in the beginning stages of all my time attacks.
The pads are very good however they need to be heated up gradually in the first 3-5 laps by applying steady pressure to the pedal of no more than 70%. This will heat them up to the point where the vibration will not occur. Just a characteristic of this pad.
Thought I'd mention that since a lot of you have been emailing me about Project Mu's recently.
Thursday, May 27, 2010
Tuning Day at Fuji
Here are some photos from a tuning day I attended at Fuji Speedway earlier this month.


Subscribe to:
Posts (Atom)